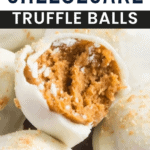
No Bake Pumpkin Cheesecake Balls
No bake pumpkin cheesecake balls are the perfect sweet appetizer or a dessert. Creamy pumpkin flavored balls covered in sweet white chocolate with an addicting crunch in every bite.

Say hello to these no bake pumpkin cheesecake balls! This delightful fall dessert combines the rich flavors of pumpkin, cream cheese, and warm spices, all rolled into bite-sized balls covered in white chocolate. Perfect for gatherings, potlucks, or a cozy night in, these cheesecake balls are not only a breeze to make, but they also deliver a satisfying burst of pumpkin goodness in every bite.
How To Make No Bake Pumpkin Cheesecake Balls
Ingredients needed
- Canned pumpkin
- Cream cheese
- Sour cream
- Powdered sugar
- Pumpkin pie spice
- Graham crackers
- White chocolate
Important tip before starting the recipe
If you’ve never melted chocolate before you may not know that you don’t want to get it too hot. The saying that chocolate melts in your mouth and not in your hand is true. Chocolate has to be tempered correctly, but I’ll help you.
Split the chocolate because when you melt chocolate you break the bonds. But, when you add in the chocolate that still has the bonds the chocolate can temper correctly again when cooled. If you do it correctly the chocolate will not rub off on your hand when you touch it. And it’ll have that perfect snap when you bite into the bites.

Making the no bake pumpkin cheesecake balls recipe
- Using the food processor, blend the graham crackers until they are basically dust.
- In a bowl, combine the cream cheese, pumpkin, sour cream, powdered sugar and pumpkin spice. Then, stir in the pulverized graham crackers. Place in the fridge for a few hours for it to harden up.
- Once hardened, use a large cookie scoop and roll the balls with your hand. After you’ve rolled the balls with your hand, melt the chocolate.
- In the microwave in 30 second intervals melt the chocolate. Stir after each interval, even in the beginning before it starts to melt. Once you reach the point where its pretty much all melted, do a last 30 seconds and stop. At this point, add the other half of the chocolate chips in and stir until they are melted.
- Now, start rolling the balls in the melted chocolate then place on parchment paper. Drizzle over chocolate if you see any missed spots after placing on the parchment paper. If you want to add something to make them pretty like glitter or crumbled graham crackers now is the time.
- The chocolate will cool very quickly as you finish the rest. Once you are done and chocolate has hardened they are ready to serve.
Other great finger foods and desserts to try
Follow Sugarless Crystals on Pinterest & Instagram for all my recipes!

No Bake Pumpkin Cheesecake Balls
Equipment
Ingredients
- 16 graham crackers, blended
- 1/3 cup canned pumpkin, blotted with paper towel
- 4 ounce cream cheese, room temp
- 2 tablespoon sour cream
- 2 tablespoon powdered sugar
- 1 teaspoon pumpkin spice
- 2 cup white chocolate chips 1 cup melted then other cup for mixing
Instructions
- Using the food processor, blend the graham crackers until they are basically dust.
- In a bowl, combine the cream cheese, pumpkin, sour cream, powdered sugar and pumpkin spice. Then, stir in the pulverized graham crackers. Place in the fridge for a few hours for it to harden up.
- Once hardened, use a large cookie scoop and roll the balls with your hand. After you've rolled the balls with your hand, melt the chocolate.
- In the microwave in 30 second intervals melt the chocolate. Stir after each interval, even in the beginning before it starts to melt. Once you reach the point where it’s pretty much all melted, do a last 30 seconds and stop. At this point, add the other half of the chocolate chips in and stir until they are melted.
- Now, start rolling the balls in the melted chocolate then place on parchment paper. Drizzle over chocolate if you see any missed spots after placing on the parchment paper. If you want to add something to make them pretty like glitter or crumbled graham crackers now is the time.
- The chocolate will cool very quickly as you finish the rest. Once you are done and chocolate has hardened they are ready to serve.